| Professional Studios, Equipment Rental, & Event Space |
Lighting Lessons Dimming The Sun Retouching Basics |
Achieving Pure White Backgrounds Prerequisite skills: -Basic camera operation Creating a pure white background can be one of the most difficult and frustrating exercises for a beginning photographer. Many theories and "formulas" exist for achieving pure white, but in reality, achieving pure white is more importantly a matter of managing and avoiding the negative side effects that can accompany a high-key lighting situation. Making the background white is the easy part of the setup. In a portrait situation, this can be accomplished by overpowering a white wall or roll of seamless paper behind your subject with light, opening up the aperture on your camera until the background is over-exposed, or a combination of both. However, as many of you have no doubt encountered, your images do not turn out the way that you expect. Camera flare, loss of edge contrast, uneven background exposure, and washed-out colors (less saturation) are all problems associated with shooting on white. It is the same set of problems that exist when shooting an outdoor portrait photo into the sun. Now, for the fashion and art shooters, this is a technique they use to create a "look", but for those aiming to create a properly exposed image on white, some adjustments need to be made. Let's look at our intial setup and see if we can improve our process:
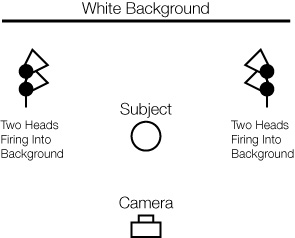
This is our setup in its simplest form, with no lights added as of yet. Before we begin, let's create a checklist of things that we want to accomplish: 1. Create an evenly exposed white background with
no hotspots or shadows Create An Evenly Exposed Background There are many ways to evenly light a white background, and pros use a combination of different techniques to do so. In general, a background for a headshot can be lit with just two lights, but for anything larger, four heads is strongly recommended to avoid the hotspots & shadows that can result. Because we are simply trying to create an even wash of light on the background, we want to avoid shaping the light in ways that create hotspots. Think about your shadow on a partly cloudy day. When the sun is shining directly on you, there is a distinct difference between the amount of light reaching the ground and that in your shadow. However, when a cloud moves into the path of the sun, suddenly your shadow disappears. This is because the size of the light source is getting larger as it is diffused by the clouds, and the ground is now lit evenly around you, reducing contrast. Let's look at what happens when four heads are used, but with small, standard reflectors pointed at the background:
The two ways that we can enlarge our light sources are through diffusion and reflection. Although diffusion works well in creating an even wash, reflected light works even better when bounced off a matte white surface. The two favorite reflection tools of the pros are white umbrellas and white v-flats (4'X8' sheets of foam core taped together, like a book). Lets look at how these setups are executed, without worrying about controlling light spill yet:
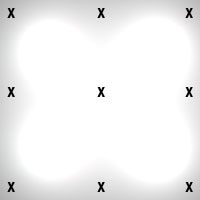
Now that you have your lights in place with the method of your choice, it is time to fine-tune the exposure. Depending on the size of the background you need to cover, you will need to adjust the placement of your lights accordingly. A group shot will obviously need much more width between the lights than a one person portrait, and the height of the subject(s) will determine the height of the lights on their respective stands. The important thing is that the background is as evenly-lit as possible when finished. Both groups of two lights should be equal distance and at the same angle to the background. The power of the lights should all be the same. Once this is done, take a general exposure reading by placing your light meter against the background and pointing it at your camera. Be sure to not stand in the way of the lights and prevent light from hitting your meter, and fire the lights with either a sync cord of radio remote such as a Pocket Wizard. For this example, let's say that your reading is F/8.5. You will need to verify this reading by metering at many different points across the background. I have added the photo from earlier with the typical problem areas to watch for:
You will want to get the readings from your meter as close as possible across the background. If everything is set up correctly, your readings should all be within 1/10 of a stop from your camera setting (in this case, no more than f8.4 or less than f8.6). A little trick to find out if you have even lighting (if you are shooting digital) is to take a shot with your camera that is underexposed. For example, set your aperture to 1-2 stops below meter reading (in this case, f11.5 or f16.5) and preview it on your computer. In Photoshop, you can move your mouse over the image while looking at the info palette to see how similar the values are. You are looking for similar values, such as 220,220,220 RGB for example, across the image. Remember, pure white in RGB is 255,255,255 and anything less is a shade of gray. Taking Camera Flare Out Of The Picture Anytime you are shooting in a high key/high contrast situation, you are dealing with the possibility of inducing camera flare and reducing contrast/color saturation. This is the reason your camera lens has a lens hood. It prevents excess light from hitting your lens and increases contrast and color saturation. A real-world example of flare is trying to look through a shop window from the outside on a sunny day. If you stand a few feet in front of the window, you can somewhat see through it, but you will see your own reflection in the glass. The way to solve this is to walk directly up to window and use your hands to shield the light around your eyes. All of a sudden, the inside of the shop is revealed! This same principle applies to lighting the way it does to your camera lens. Because excess light is the enemy of a contrasty, saturated image, we need to create a "lens hood" around our subject the way that we use it around our camera lens.
This is an actual setup used by the pros, but not necessary or feasible for everyone. I have used this example to emphasize the importance of eliminating excess light from hitting the camera lens. At its most basic, any light bouncing off of the white background that is not within the frame of composition when you look through your camera is not necessary and should be eliminated. The exception is if you or your subject will be moving, and therefore the space around the subject should be expanded. Black curtains, "flags", duvetyne, and black foamcore are just some of the materials that you can use around your subject. The materials that you use can vary, but they should be black and absorb excess light. The subject(s) should sit or stand in front of the black framing material to prevent excess light from hitting them. Pro photographers will even shoot with the black material in the frame as close around the subject as possible and remove it later in Photoshop, because this increases contrast even further. Let's look at our setup now from above:
Fine-Tuning Edge Contrast Now that we have an evenly lit background, and we have eliminated the excess light being bounced off the background from hitting our camera, let's turn our attention to edge contrast. Edge contrast is the ability of our camera to separate the white background from the edge of our subject, but we can help it out with good lighting technique. Let's face it, some lenses are better than others. Otherwise, we could all buy the cheapest ones and produce the highest quality images. We have to know the capabilities of our equipment, and how far we can push it. But here is the trick to lighting our subject on a white background: WE DON"T METER THE FRONT OF OUR SUBJECT, WE METER THE BACK OF OUR SUBJECT! Depending on the quality of your lens, and it may vary from lens to lens, you have to know how much light your lens can handle. To find out, take your meter and place it on your subject's back, pointing it towards your white background. Fire the lights and take a meter reading. Most lenses can handle anywhere from 1/3 stop to 2/3 stop of overexposure on the edge of your subject. This means that if the reading on the back of your subject is f/8, then your final aperture setting on your camera is going to be anywhere from f/5.6 3/10 to f/5.6 7/10. The reason that we want to overexpose the background slightly is to guarantee pure white. Even the best lights do not fire perfectly every time, and your background might not be evenly lit. Remember, we haven't placed any key or fill lights yet in front of the subject, but now is a great time to test our edge contrast. Take your camera and set it at the meter reading from your subject's back, and start taking pictures, each time opening up the aperture in 1/3 stop or smaller increments if possible. You will see that as you begin to overexpose the subject, the edge contrast will begin to deteriorate and the light will spill onto the subject. Your goal is to find the setting that is optimal for your camera/lens combination where edge contrast is the sharpest. Set your camera to this aperture, and now you are ready to light from the front. Place your key & fill lights as you would normally, and meter them to the optimal level that you just set on your camera. *There is just one more thing that you have to be careful of. Because we just added light to the front of the subject, that means more light will be hitting our white background and bouncing back towards our subject. Meter the back of your subject as before, and make sure the light intensity hasn't changed (the distance from your subject to the background and subject to key/fill lights will affect how much extra light there is). If it has changed, you will have to adjust your background lights accordingly to maintain proper exposure. There you have it. A perfectly exposed white portrait - just like the pros. Enjoy. Advanced Topics -Color temperature/white balance: If you add gels to warm up the skin of your subject, or are using light modifiers that are warmer in color temperature, you will have to compensate by cooling the temperature of your background or it will turn a yellowish white. For example, if you put a 1/4 CTO (warming gel) on your key light, you may have to balance it by putting a 1/8 - 1/4 CTB gel on your background lights to create a neutral white. Use a color meter to make sure it is exactly where you want. -Additional flare protection: Additional sheets of black foamcore or "flags" should be placed between your lights and the camera at all times. As a general rule, if you look from the front of your camera lens and can see the lightbulbs or light being reflected directly, you must put something in-between to prevent flare. In the earlier example using umbrellas, a black V-flat is usually placed around the umbrellas to prevent light from hitting the camera. -Ideal Aperture: Every lens has an f-stop (or several) where resolution is the highest and the possibility of flare is minimized. Because we are shooting on white, there is no background detail that we have to worry about. Unless we a shooting an up-close macro portrait with selective focus, we will want to set our aperture at our lens "sweet spot". This is typically anywhere from 1-3 stops from maximum aperture (i.e. f/4 - f/8 on an f/2.8 maximum lens). Perform your own tests to find the best settings for each lens that you own. -Full-length shots with no shadows: You will have to light the white ground evenly the same way you light the white background, with one additional challenge. You have to place the lights high enough so that when you light the ground evenly to pure white that the head and upper half of the subject is not overexposed. Remember, the head of the subject will be closer to the light source than the ground, and therefore be hit by more light. This is why full-length shots are generally done in very large studios, natural light studios, or bounced off a high ceiling or white flat. According to the scientific principles of light, the farther away the light source, the less falloff over short distances (this is why the sun lights your body evenly from head-to-toe). Music video cinematographers use lights called "space lights" or Kino Flos hung up high and diffused through fabric such as gridcloth (the same material on the front of a softbox) to create a perfectly white environment. Good luck, Brian Bannister ©Copyright 2007 Loft 19 Studios, LLC. All rights reserved. -
|
|
| © 2004-2007 Loft 19 Studios, LLC. All Rights Reserved. | ||